14 Yin Yoga Poses for Runners for Recovery & Relaxation

To runners, rest days mean:

  • A day of no running
  • A day of no cross training
  • No strenuous physical activity whatsoever

But what about yoga for runners

Can we do yoga on the days when we’re supposed to do nothing? 

Yes! 

Lucky for runners, yin yoga offers many yoga poses for runners and sequences to take your rest days to the next level. 

In yin yoga:

  • Poses are held for a long period of time, anywhere from three to 10 minutes.
  • Poses target the connective tissue.
  • The stillness derived from the practice induces a supremely calm, relaxed state by tapping into the parasympathetic nervous system, responsible for resting and digesting. 

In other words, yin yoga was made for runners’ rest days. 

In addition to rest days, runners can use the following sequence:

  • Before bed to unwind from the day’s run or cross training
  • Upon waking in the morning the day after a tough workout
  • In the middle of the day for a restful lunch break
  • Anytime that feels right to the individual, but NOT before a run

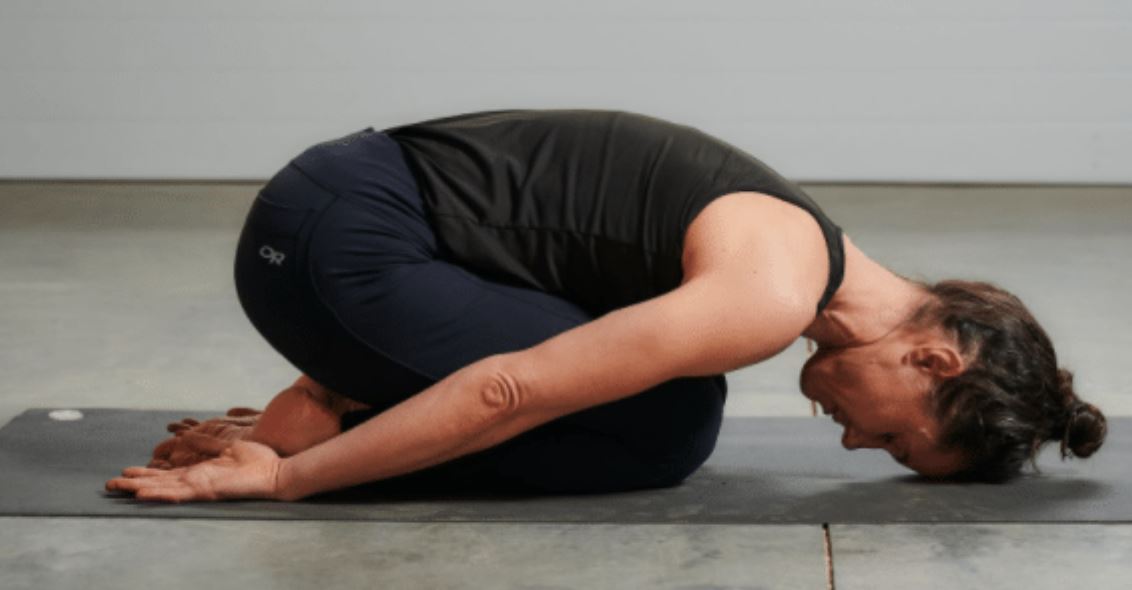
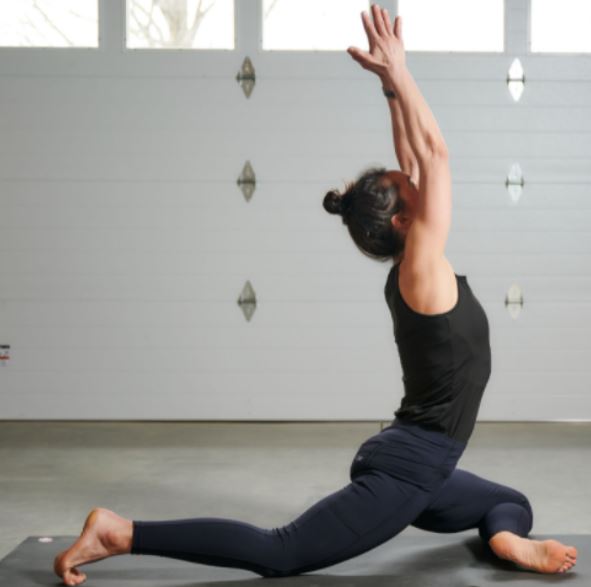
What to do in each pose:

  • Breathe slowly and deeply in and out of the nose
  • Close the eyes if so desired 
  • Listen to your body - if a pose does not feel right or causes pain, skip it
  • Come only as deep into poses as you can hold for an extended amount of time
  • Be as still as possible in the poses, with the only movement coming from deep breathing
  • Set a timer or count breaths to time yourself - five slow breaths is about one minute
  • Hold each pose for two to three minutes to begin and build up to five to seven minutes
  • Savasana can be held for 10-15 minutes if time allows

1. Buddha Squat/ Malasana

1. Buddha Squat/ Malasana (Photo/Steve Barber, Unit4media)
  • Stand with your feet wider than hip-width
  • Turn the toes out and heels in, keeping the kneecaps tracking (in line) over the toes
  • Lower down into a squat
  • Reach the arms forward if balance is an issue
  • Once the butt is all the way down, press the palms together in front of the heart and rest elbows on inner thighs 
  • Relax all muscles and soften into the pose

Common limitations in the pose and how to accommodate them:
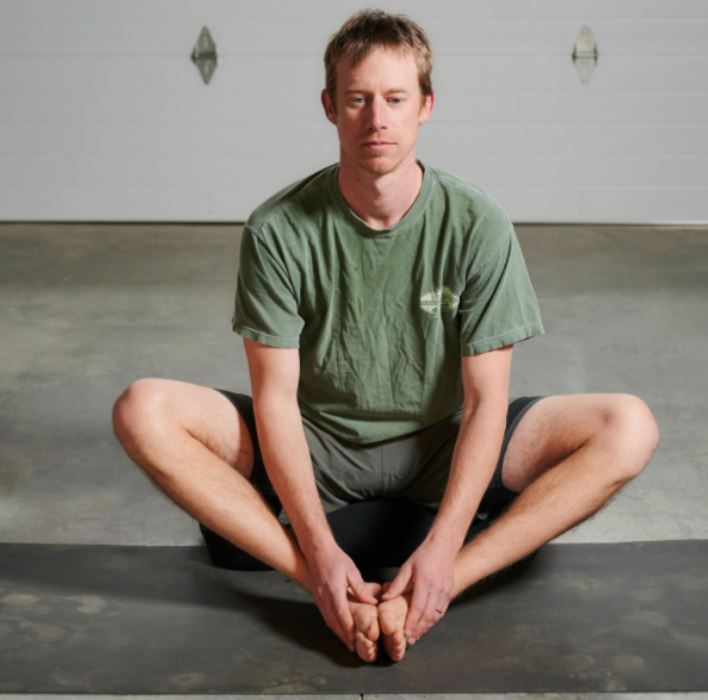
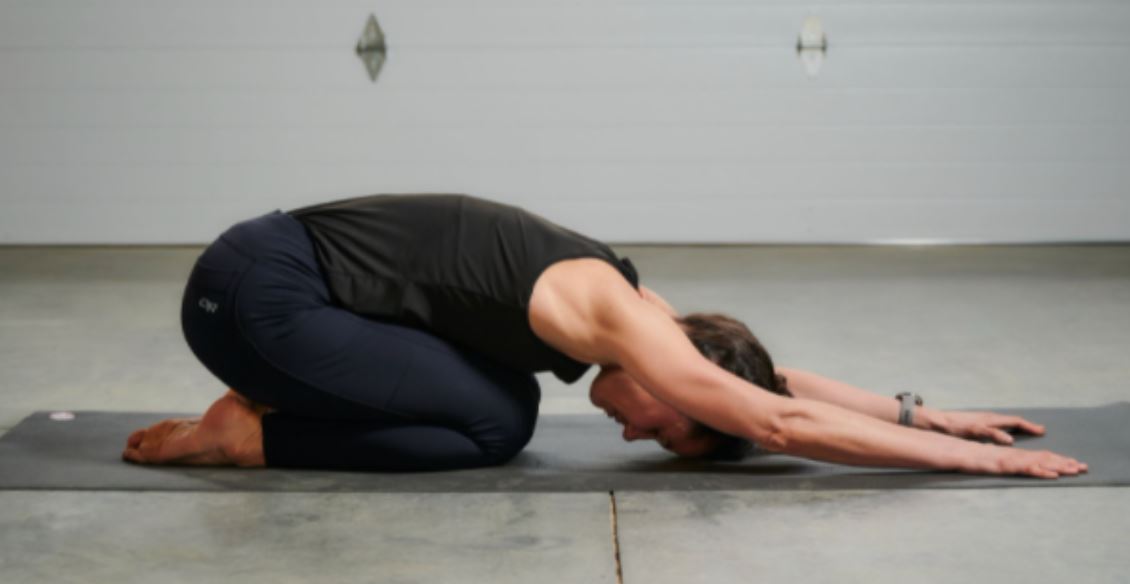
  • Heels that cannot reach the ground - place rolled up blankets or towels underneath the heels
  • Inability to stay upright/ rolling backward - reach the arms out in front between the legs and keep the hands on the ground and/or place blocks, pillows or bolsters underneath the butt for support
  • Knees that cannot bend deeply - place pillows, blankets or blocks underneath the butt until sitting is comfortable
  • Knee pain due to surgeries or injuries - skip this pose and do Happy Baby Pose 

2. Butterfly Pose/ Baddha Konasana

2. Butterfly Pose/ Baddha Konasana on a block (Photo/Steve Barber, Unit4media)
2. Butterfly Pose/ Baddha Konasana (Photo/Steve Barber, Unit4media)
  • Sit on the ground on a block if the hips are tight or knees are floating very high off the ground (photo one) or on the mat (photo two) 
  • Bring soles of feet together
  • Sit up tall by reaching the crown of the head to the ceiling
  • If folding forward without rounding the back is possible, do so

Another version:

  • Slide the feet farther away from the pelvis to make a large diamond shape with the legs and drape yourself over the legs

3. Seated Wide-Legged Forward Bend Pose/ Upavistha Konasana

3. Seated Wide-Legged Forward Bend Pose/ Upavistha Konasana sitting on a block with hands on bolster (Photo/Steve Barber, Unit4media)
3. Seated Wide-Legged Forward Bend Pose/ Upavistha Konasana with hands on mat (Photo/Steve Barber, Unit4media)
3. Seated Wide-Legged Forward Bend Pose/ Upavistha Konasana with forearms on mat (Photo/Steve Barber, Unit4media)
3. Seated Wide-Legged Forward Bend Pose/ Upavistha Konasana holding the big toes (Photo/Steve Barber, Unit4media)
  • Sit on the ground and extend the legs wide to the sides
  • If your back rounds extensively in the pose or you cannot sit up tall (photo one):
    • Place a block, books or bolster under the butt 
    • Put pillows or bolsters between the legs so the arms have somewhere to rest

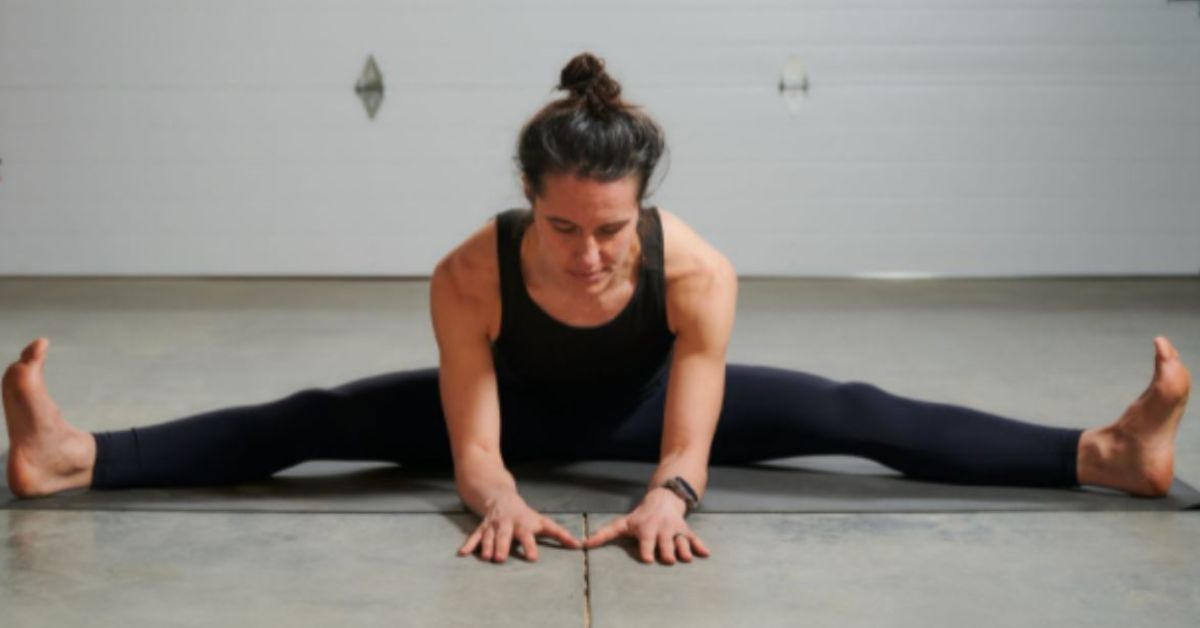
If sitting with wide legs is comfortable: 

  • Walk the hands forward and only come down as far as is comfortable or until you feel a good stretch that can be held for several minutes (photo two)
  • Come to the forearms if the stretch feels too easy (photo three)
  • Last, if resting on the forearms feels too easy, hold onto the big toes or outsides of the feet (photo four)

4. Frog Pose

4. Frog Pose (Photo/Steve Barber, Unit4media)
  • If the wide-legged seated forward bend is do-able without sitting on anything, try Frog Pose
  • Come onto the hands and knees
  • Slide the knees apart from one another until a stretch is felt on the inner thighs
  • Keep the ankles and feet, knees and thighs and hips and thighs all at 90 degrees
  • Place blankets under the knees if they are sensitive

To come out of it:

  • Either slide the torso forward 
  • Or walk the hands back to come into Child’s Pose
  • Or wiggle walk the knees back in  toward one another until you are on hands and knees again

5. Child’s Pose/ Balasana

5. Child’s Pose/ Balasana with arms stretching out front (Photo/Steve Barber, Unit4media)
5. Child’s Pose/ Balasana with arms along the sides (Photo/Steve Barber, Unit4media)
  • Bring the knees together
  • Using the hands for support, shift the hips back toward the heels
  • The hips do not have to rest on the heels as shown in the photos
    • If the knees are sensitive and cannot bend this deeply, keep the hips stacked above the knees
  • Rest the forehead on the mat
    • If the forehead cannot reach the mat, place a block underneath it or take the knees wide apart while keeping the toes together
  • Stretch the arms out in front (photo one) 
  • Or reach the arms back along the sides (photo two)

6. Sphinx Pose

6. Sphinx Pose (Photo/Steve Barber, Unit4media)
  • Lie flat on the belly
  • Come up on the forearms
  • Stack shoulders directly on top of the elbows
  • The upper arm bones will be straight up and down, as shown in the photo
  • Rest palms on mat

7. Hero Pose/ Virasana

7. Hero Pose/ Virasana sitting on two blocks (Photo/Steve Barber, Unit4media)
7. Hero Pose/ Virasana, from the back (Photo/Steve Barber, Unit4media)
7. Hero Pose/ Virasana, from the front (Photo/Steve Barber, unit4media)
  • Come to the hands and knees
  • Place two blocks stacked on top of one another behind you between the feet (Pillows, bolsters or stacks of books can also be placed under the butt)
  • Walk the hands back to begin to lower the butt toward the space between the feet 
  • Set the butt on the blocks (photo one) and sit up

Precautions: 

  • If your knees and ankles feel OK on two blocks, remove one block
  • If you feel OK on one block, with zero sharp pain feelings, remove one block
  • If the butt hovers above the ground and cannot rest easily on the ground, then sit on a block or a book that fits the thickness your body needs, if a block is too high

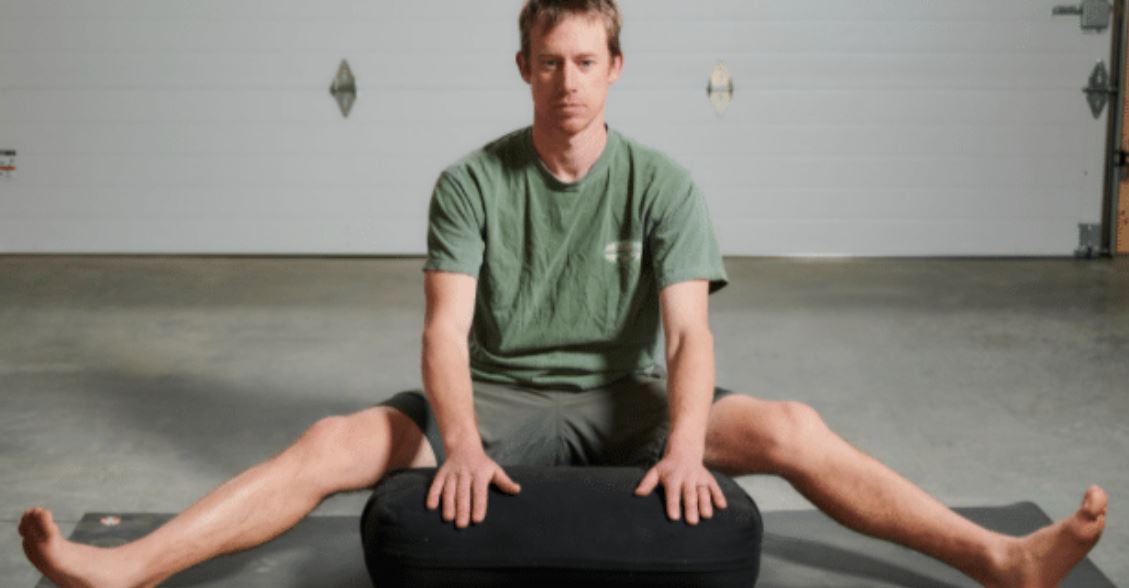
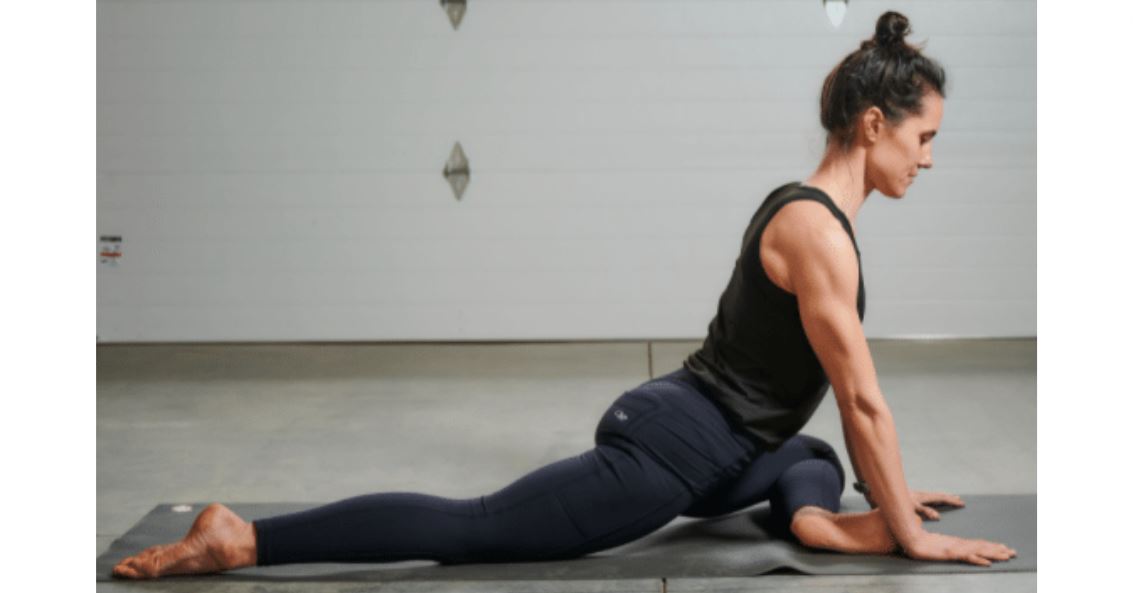
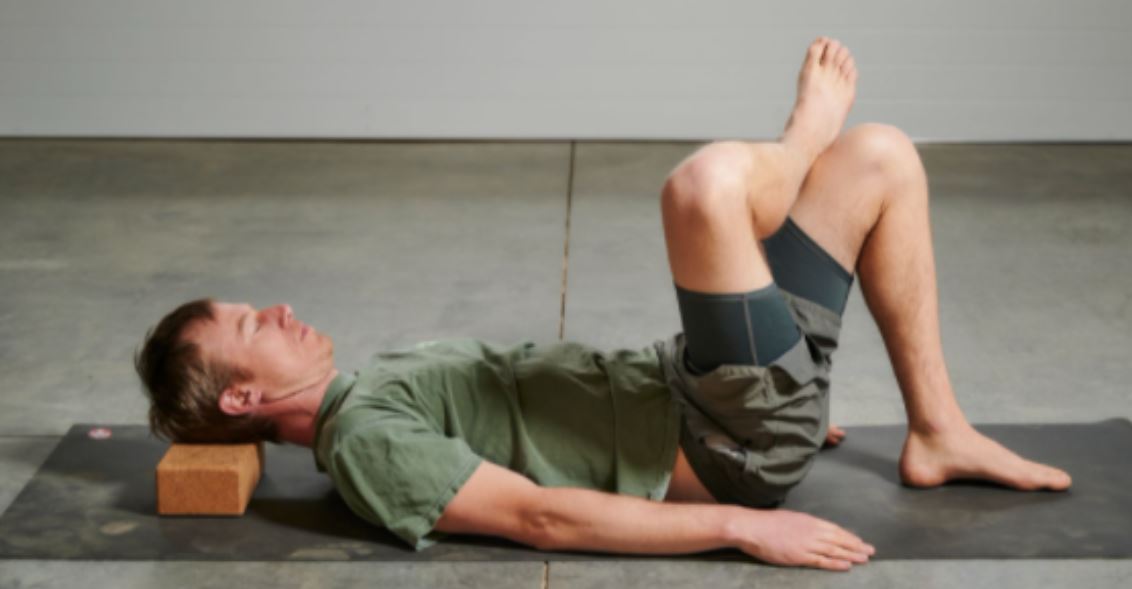
If you do not feel you need to sit on anything, then move to the version on photos two and three:

  • To keep the knees together, come onto hands and knees again and bring the inner legs to touch - knees will be together
  • Take the feet wider than the knees while keeping the knees together
  • Walk the hands back to begin to lower the butt toward the space between the feet 
  • Rest the butt between the feet and sit up tall
  • Only do this version if it feels good

8. Downward Facing Dog/ Adho Mukha Svanasana

8. Downward Dog
  • Stand at the top of the mat
  • Fold forward
  • Bend the knees enough to plant the hands on the mat shoulder-width distance apart
  • Walk the feet back three to four feet, until the hips make an inverted V position with the body
  • Look back toward the feet to create space in the back of the neck
  • Allow the head to relax and hang loosely
  • Spread the ten fingers wide and press the thumbs and index fingers down into the mat
  • Roll the triceps and upper arm bones in toward one another to create space in the upper back
  • Let the heels sink toward the mat - they do not have to touch
  • Engage the quadriceps muscles in order to open the backs of the legs
  • Keep a slight bend in the knees to avoid hyperextending
  • If need be, keep a medium to big bend in the knees - this depends on the openness of your hamstrings 

9. Lizard Lunge Pose

9. Lizard Lunge Pose with arms straight (Photo/Steve Barber, Unit4media)
9. Lizard Lunge Pose with one forearm on mat and other hand pressing bent leg outward (Photo/Steve Barber, Unit4media)
9. Lizard Lunge Pose on forearms (Photo/Steve Barber, Unit4media)
  • From Downward Facing Dog, step the right foot forward on the outside of the right hand
  • Lower the back knee down to the mat
  • Roll to the outer edge of the right foot as shown in the photos while keeping the toes flexed back toward the knee
  • Stay on the palms of the hands (photo one)

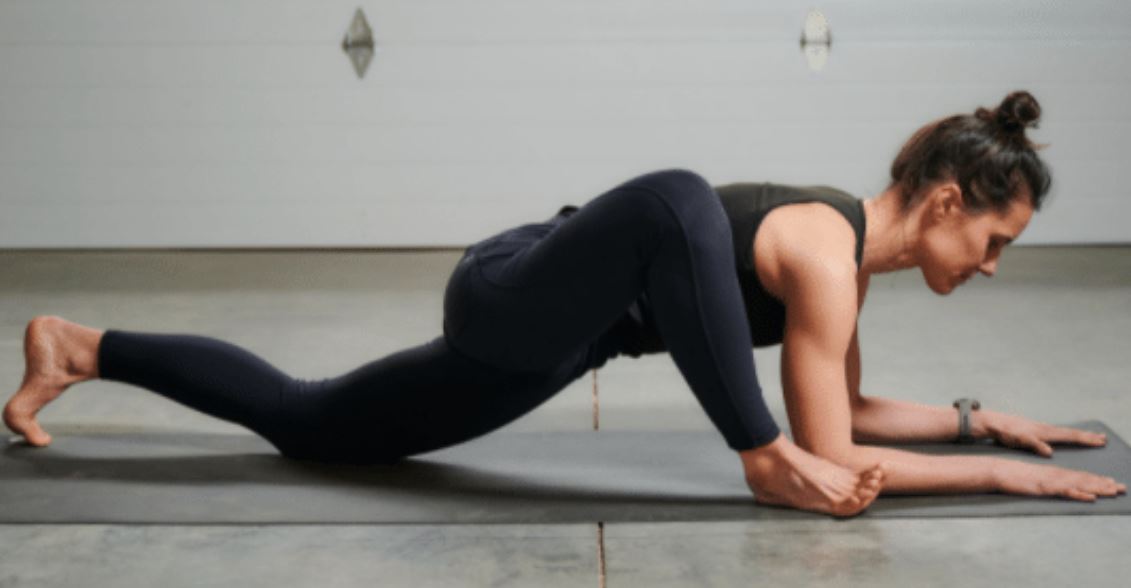
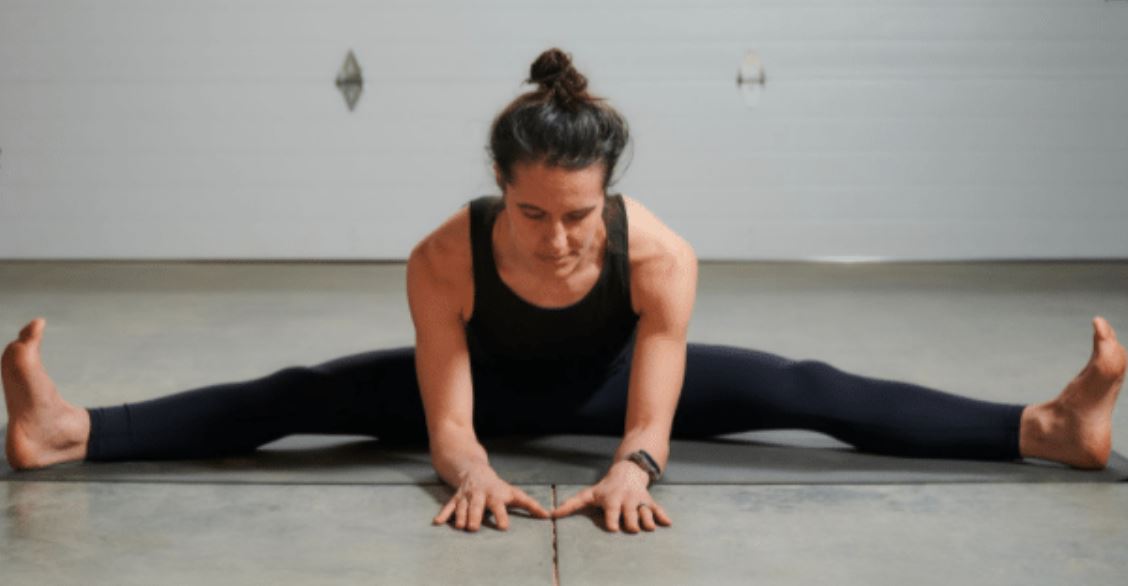
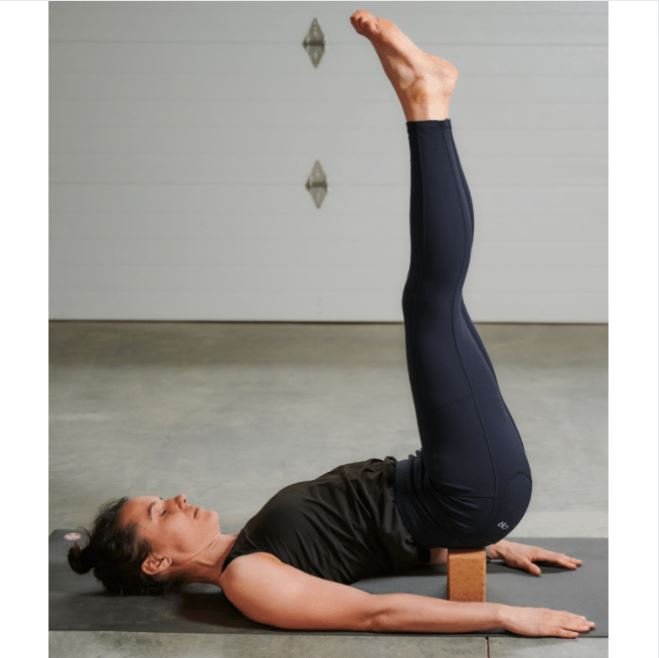
If the hips have space to go deeper, lower the left forearm to the mat and press into the right inner thigh with the right hand (photo two)

  • If photo two is easy, place both forearms on the mat (photo three)
  • Repeat on other side
  • This is a preparatory pose for the next one, Pigeon Pose

10. Pigeon/ Sleeping Swan Pose

10. Pigeon Pose with left leg and straight arms (Photo/Steve Barber, Unit4media)
10. Pigeon Pose with left leg and arms lifted for strengthening the hips before releasing them (Photo/Steve Barber, Unit4media)
10. Pigeon Pose/ Sleeping Swan with right leg with head resting on mat and arms stretched straight out (Photo/Steve Barber, Unit4media)
  • You may stick with Lizard Lunge, the preparatory pose for Pigeon, before moving on to this one
  • If Pigeon Pose causes discomfort in the form of sharp pain in the ankles, knees, hips or back, do Lizard Lunge or the next pose, Reclined Figure Four
  • To get into Pigeon: From Downward Facing Dog, bring the left shin forward and place it on the mat, as shown in photos one and two
  • The left foot will be near the right hip bone
  • Press the outer edge of the left foot into the mat to protect the knee joint
  • Draw the left hip back while simultaneously drawing the right hip forward, creating a scissoring action in the hips that stabilizes the pelvis
  • If the hip is floating high off the mat, place a block or bolster underneath it (photo one)
  • If the stretch is intense enough, stay upright on the hands (photo two) 

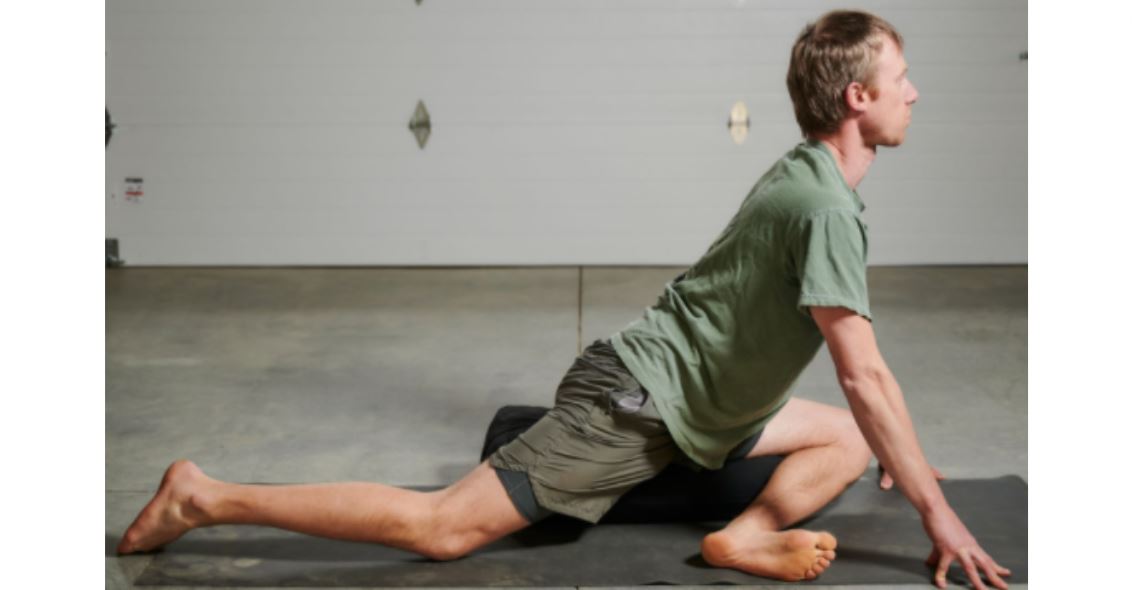
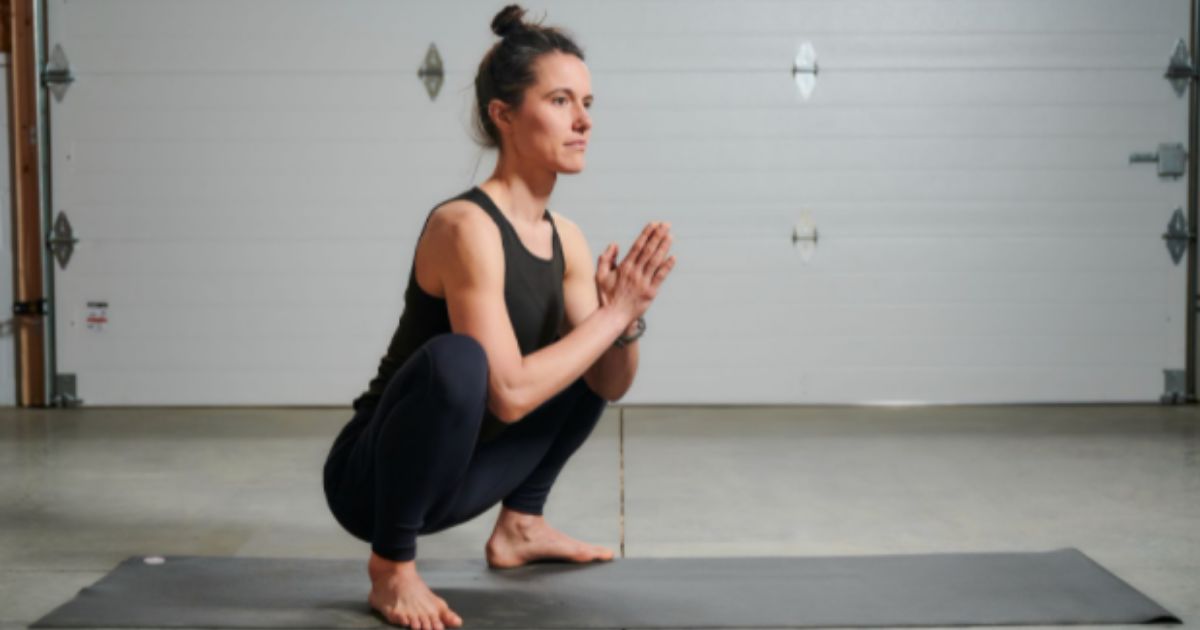
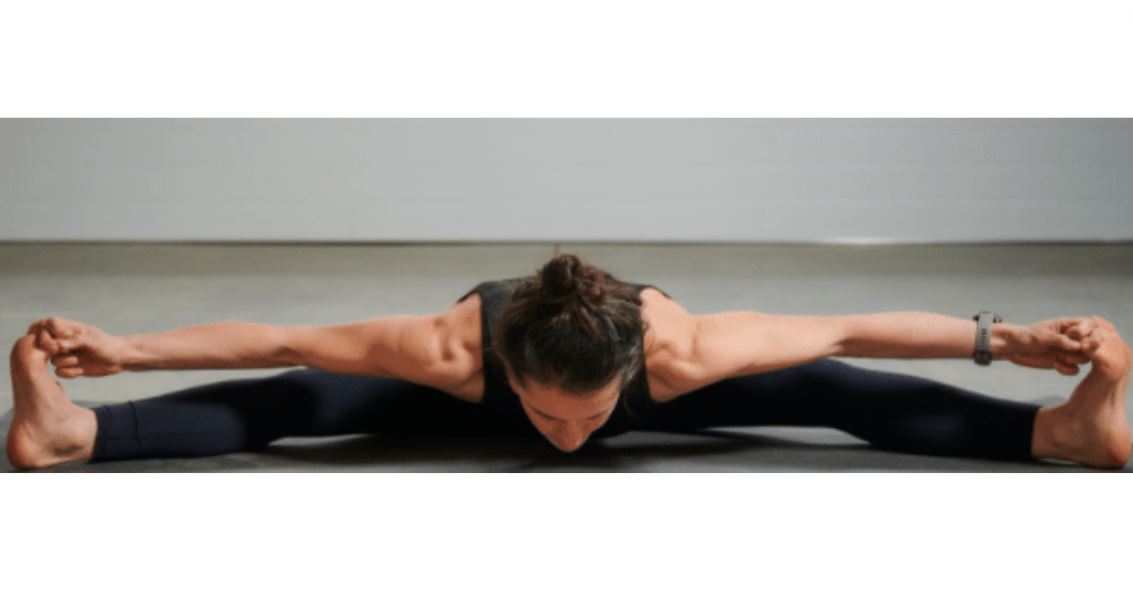
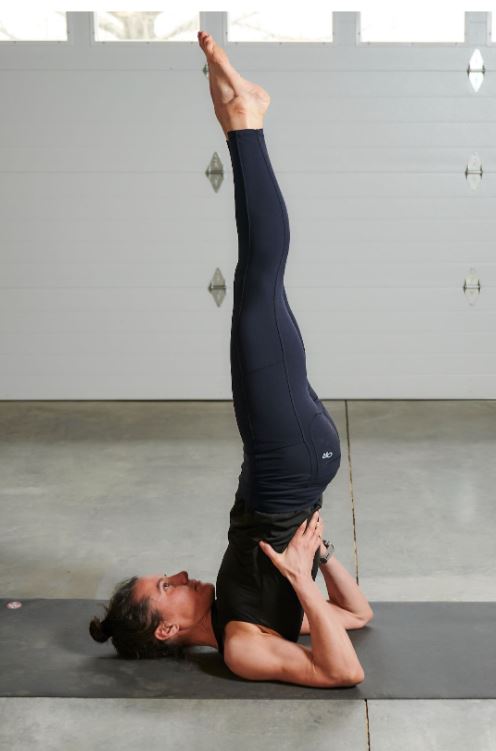
If the hips are strong enough (photo three):

  • Tuck the back toes
  • Keep the scissoring action in the hips by isometrically dragging the left hip back and right hip forward - this is key to lifting the arms
  • Press the outer foot strongly into the mat
  • Try lifting one arm up to the sky
  • If it did not work, come out of it
  • If one arm lifted feels easy, then try lifting both arms 
  • Hold for five to eight breaths, not as long as the restful poses
  • Return to hands on mat (photo two) to come out of the pose
  • Bring the forearms to the mat if more stretch is desired (photo four)
  • If the hips are very open, walk the arms long out in front while resting the forehead on the mat (photo five)
  • Repeat on other side

11. Reclined Figure Four Pose

11. If Pigeon Pose/ Sleeping Swan do not suit your body, do Reclined Figure Four Pose (Photo/Steve Barber, Unit4media)
  • Do this pose if Pigeon/ Sleeping Swan Pose does not work for your body in any way; for instance, if it causes pain in the hips, knees, ankles or back
  • Lie on the mat and bend the knees
  • Place one ankle above the opposite knee
  • If no stretch is felt here, keep the same shape with the legs while bringing the legs in toward the chest
  • Hold the back of the hamstring or front of the shin of the leg whose foot was on the mat
  • Place a block under the head if the head cannot lie flat on the mat without arching back

12. Shoulder Stand/ Sarvangasana (Two Versions)

12. Shoulder Stand with hips on block (Photo/Steve Barber, Unit4media)
12. Full Shoulder Stand/ Sarvangasana (Photo/Steve Barber, Unit4media)

Version One (photo one):

  • Lie flat on the back
  • Bend the knees and place the feet flat on the mat
  • Press into the feet to lift the hips to come into Bridge Pose
  • Place a block under the hips and lower the sacrum, the triangular bony part of the low back, to rest on the block
  • Lift the legs up to the sky

Version Two (photo two):

  • If you are a regular practitioner of shoulder stand, feel steady on the block and do not have neck issues, try version two.
  • Come into it from version one by lifting the hips up off the block and supporting the back with the hands
  • Walk the elbows close to one another so that they are not splayed outward
  • Be sure not to rest on the neck or cervical spine - the body weight is supported by the shoulders 
  • Lift the legs straight up to the sky and squeeze them together
  • Engage the core and leg muscles firmly, reaching tall to the ceiling
  • To come out of it, lower the legs behind the head, straighten the arms along the sides, and slowly with control, lower the hips then legs to the mat

13. Reclined Twist Pose

13. Reclined Twist (Photo/Steve Barber, Unit4media)
  • Lie flat on the back and hug the left knee into the chest
  • Twist to the right
  • Hold the left outer knee with the right hand
  • Stretch the left arm straight out to the side or to the back of the mat as shown in the photo

14. Supported Savasana

14. Supported Savasana (Photo/Steve Barber, Unit4media)
  • Place two or three bolsters, pillows and/or blankets underneath the lower legs
  • Lie the arms along the sides
  • Close the eyes
  • Relax every muscle in the body
  • Place two or three bolsters, pillows and/or blankets underneath the lower legs
  • Lie the arms along the sides
  • Close the eyes
  • Relax every muscle in the body

More on Yoga for Runners

About Brynn, registered yoga teacher and Inhale Exhale Run founder

Rate This:


Share This:

Subscribe

and never miss our new running content!
(you also score chances to win gear)
988
Brynn Cunningham
Ambassador
41 Followers
15 Following

Trail runner, ultrarunner, white water boater, cyclist (mostly MTB), swimmer, triathlete, cross country and backcountry skier...

Comments

Login to your account to leave a comment.

Related Articles

Trending WeeViews

Image of Black Squirrel 5k
Image of Other Oladance OWS sports earbuds
Image of Altra Altra Rivera 3
Image of Cleveland Clinic Run for home 10k
Image of Hoka One One Mach 6
Full Review

Join the Community

It's FAST and FREE. Create a short profile and link any desired social media accounts, personal websites or blogs.

Search

Want to Earn Free Running Gear?

We offer opportunities for sponsored gear and race entries for sharing your reviews.

What are you waiting for?  We want to hear what you have to say!